3 Point Hitches For Tractors And Their Uses (With Diagrams)
Posted on by
A 3-point hitch is an essential part of almost all tractors today.
This tool connects an agricultural or industrial tractor with plows and other implements. Also, when using it, your tractor will have more usable traction.
This article will give you a detailed overview of 3-point hitches for tractors and their uses in your daily farm work, along with diagrams to help you find the right hitch for your situation.
*This post may have affiliate links, which means I may receive commissions if you choose to purchase through links I provide (at no extra cost to you). As an Amazon Associate I earn from qualifying purchases. Please read my disclaimer for additional details.
3 Point Hitches For Tractors And Their Uses
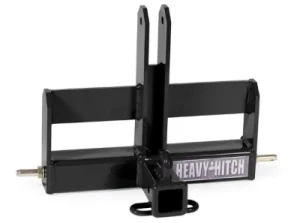
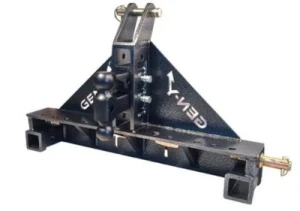
A 3-point hitch (or 3-point linkage) is a simple connector between a tractor and an implement (or an attachment) in agricultural machinery.
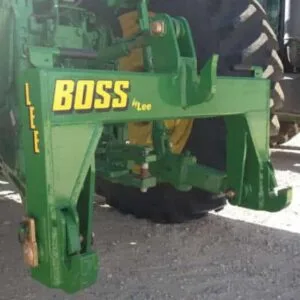
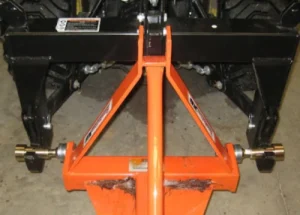
Three-point hitches look like triangles and are constructed with 3 movable parts: two lower arms controlled by the hydraulic system, and the upper center arm, or top link.
By using a three-point hitch, you can transfer that implements weight and resistance to the tractor’s drive wheels using this connector.
The invention of 3-point hitches opened a new era in agricultural life as it helps farmers yield, lowers human labor costs, and boosts the tractor’s functionality.
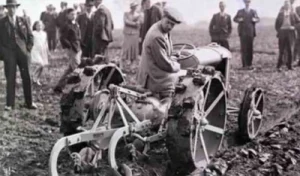
The first 3-point hitch was invented by Harry Ferguson in 1936.
In 1938, Ferguson made a production agreement with Ford Corporation to apply the first 3-point hitch to the Ford model 9N tractors in 1939, which then became a big success for Ford.
After the success of the 3-point hitch on the Ford 9N-Series, other manufacturers started producing their 3-point hitches.
By 1960, the specifications of the 3-point hitch became standardized in the agricultural industry by the American Society of Agricultural Engineers (ASAE 217) and then the International Association for Standardizations (ISO 730-1).
3-Point Hitch Dimensions Diagram
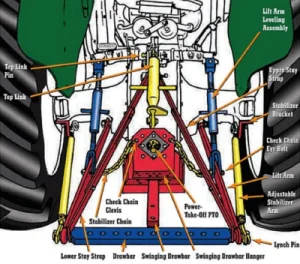
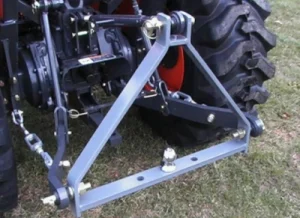
A 3-point hitch is made of the 4 following parts to attach a wheeled tractor to an implement:
Tractor’s hydraulic system
Lifting drums
Stabilizers
Attaching parts
The above diagram illustrates how these parts of a 3-point hitch are connected. These components appear in most Category 0, 1, 2, and 3 hitches.
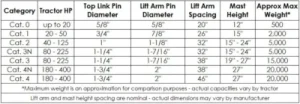
The tractor’s hitch size (or category) depends on the tractor’s drawback horsepower. A hitch in the higher category has more powerful lift arms and larger connector pins.
Hitch category
Tractor power
Top link pin diameter
Lifting arm pin diameter
Lower hitch spacing
Category 0
Up to 20HP
5/6”
5/8”
20”
Category 1
20-45HP
¾”
7/8”
28”
Category 2
40-100HP
1”
1 1/8”
34”
Category 3
80-225HP
1 ¼”
1 7/16”
40”
Category 4
>180HP
1 ¾”
2”
48”
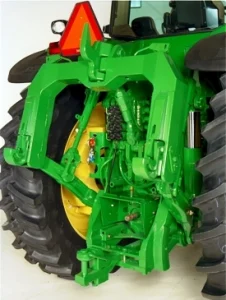
How Does A Tractor Three Point Hitch work?
A 3-point hitch receiver is constantly attached to the rear of a tractor and consists of 2 lift arms and a top link with the operational concepts as below:
Two lift arms: The tractor’s hydraulic system controls the up and down movement of these lift arms and the attached implement movement.
Top link: Keeps the attached implement raised and lowered in the same vertical plane. Depending on your demands, you can adjust the length of the top link to be level or tilted.
The connecting holes of the receiver are placed at the end of the lift arms and the top links.
You can connect the three-point hitch with the implements by mating the holes with the implement pins.
You can also quickly remove or attach different implements on the tractor, depending on your work requirements.
The connecting hole size depends on the category of the 3-point hitch.
For example, a Category 3 hitch is used with a tractor of 80-225HP. This hitch has a top link pin diameter of 1¼ inches and a lift arm pin diameter of 1-7/16 inches
General Dimensions & Categories
Source: https://countryfamilyhomestead.com/
In general, three-point hitches are grouped into 5 size categories from Category 0 to Category 4.
However, they differ in the attached tractor’s power, top link pin diameter, lift arm pin diameter, and lower hitch spacing.
Category 0
Category 0 3-point hitches are light-duty, and they fit with agricultural implements of 20-inch wide with a distance or 12 inches from the lower pin to the top link pins.
A Category 0 3-point hitch works with popular tractor brands like John Deere, Bolens, Cub Cadet, Case, and so on.
And they can attach many implements like tillers, plows, back blades, cultivators, thatchers, etc.
Category 0 3-point hitches were popular in the 1970-1990s.
Up till now, they are only seen on used garden tractors and lawn tractors or old sub-compact tractors (like Sotah Beaver).
Due to the increasing demands of farmers, new sub-compact tractor models work better with a Category 1 hitch.
Category 1
Category 1 3-point hitches fit with sub-compact and compact tractors with horsepower ranging from 20HP to 45HP.
This hitch has a top link pin diameter of ¾ inches, a lift arm diameter of 7/8 inches, and the two lift arms placed 26 inches apart.
Besides the category size, you should consider your tractor’s weight capability to pick up appropriate implements.
For example, my 6-feet Category 1 rear blade weighs 300 pounds, which is too heavy for my small sub-compact Bolens tractor.
Limited Category 1
Limited Category 1 3-point hitches can be used with some small sub-compact tractors.
This hitch type has the exact mounting dimensions as the Category 1 hitch but differs in the tractor’s type, the movement of the lift arms, and how much ground clearance they have.
Category 2
Tractors that have horsepower ranging from 40HP to 100HP can work with Category 2 3-point hitches.
These hitches use 1-inch top link pins and 1 1/8-inch lift arm pins with a lift arm spacing of 32 inches.
Due to its dimensions, Category 2 hitches can handle heavier-weight implements than Category 1 ones.
For example, they can carry back blades, box scrapers, and rakes with heavier weights and sizes.
If you have already got a Category 1 hitch, you can change the pins or use bushings to get the diameter like a Category 2 one.
And vice versa, you can switch a Category 2 hitch to a Category 1 one thanks to its interchangeable balls at the end of the lift arms.
Category 3
You can use a Category 3 three-point hitch on tractors with horsepower that ranges from 80HP to 225HP.
This hitch has top link pins of 1 ¼ inch and lifts arm pins of 1 7/16 inches and accepts all implements for medium-sized 3-point hitches, like row-crop cultivators or field cultivators.
Category 4
Category 4 3-point hitches can work with tractors of 180HP or greater.
This hitch has a top link pin diameter of 1 ¾ inches and a lift arm pin diameter of 2 inches.
The spacing between two lift arm pins of this hitch type is approximately 46 inches.
Narrow Variants
Besides the above categories, there are also N (narrow) hitch variants. These variants have the same pin diameters but a lower width compared to their main categories.
Category 3N
A Category 3N hitch has a lift arm spacing of only 32 inches.
You should notice the difference between these 3-point hitches when shopping for implements as some Category 3 hitches can quickly convert to a Category 3N hitch.
Besides, Category 3N hitches with the same width as Category 2 ones can also be used with the same implements, provided that you apply bushings to the pins.
Category 4N
A Category 4N hitch has a slightly narrower lift arm spacing of 38 inches.
You may often see these above narrow variants in “quick hitches” (for example, John Deere iMatch quick hitch). These N variants allow heavy-duty tractors to attach to smaller implements easily.
Read More:How to Drive a Tractor Video and Guide. If you are new to tractors, this beginner’s guide is for you! Learn about safety rules, read statistics, and watch a helpful video.
How To Connect A Tractor 3 Point Hitch?
After purchasing a tractor, the first thing to do is to learn how to build a 3-point hitch. However, you can get this job done easier by practicing it several times.
Step 1: Connect The Hitch With Your Tractor’s Rear
First, look at the back end of your tractor. You will notice an adjustable lift arm that can go up and down and the remaining one that is fixed.
Start attaching the fixed arm to the right side of your tractor. Then, adjust its height with a linchpin until it’s aligned with the tractor.
Step 2: Adjust The Attachment
After the fixed side has been finished, you can go on with the adjustable lift arm.
Try to adjust the lower link arm to be aligned with the hole on the implement. Then, adjust the top link to the right length to return to the implement’s hole and slip a pin to finish.
Finally, slip a pin through the top link and the implement to finish.
Now the hitch has been successfully connected with the tractor. You can start using the tractor to lift your implement.
Step 3: Adjust Stabilizers
You should adjust the stabilizers to avoid the tractor’s tire damage.
The stabilizers are the turnbuckles that lie from the tractor’s axle to the lower 3-point lift arms. If you skip this step, the attachment will flop back and forth.
Some attachments and implements can flop so far that they get into the tractor’s tires and break them.
So, remember to adjust the stabilizers to keep the implement tight and protect your tractor’s tires.
Read More:How to Change a Tractor Tire Yourself. Changing a tractor tire can be a challenging task, but we show you step-by-step how to go about it AND link to a useful video!
Step 4: Attach The PTO
Before attaching the PTO, you must turn off your tractor.
Pull the collar back and slide on the shaft of the PTO until it’s past the groove in the shaft. Then, pull it back and release the collar to finish attaching the PTO.
How To Adjust A Three-point Hitch?
If you have several implements and need to swap them, you must know how to adjust your 3-point hitch.
You can make adjustments to your hitch by modifying its two main parts – the top link and the stabilizers. Please watch the following video to know how to do it:
Frequently Asked Questions
1. Are All Tractor 3-point Hitches The Same?
No. There are 5 different 3-point hitches. They differ from each other in the triangle’s dimensions and the connecting pins’ size.
2. How Much Weight Can A 3-point Hitch Lift?
The approximately maximum lifting weight of a 3-point hitch depends on the hitch’s category. For example, a Category 0 hitch can lift up to 500 pounds, while a Category 4 hitch can lift to 20.000 pounds.
3. What Is The Smallest Tractor With A 3-point Hitch?
Category 0 tractor is the smallest tractor for a 3-point hitch—for example, John Deere 140 H3.
4. What Is The Difference Between Category 1 and Category 2 Hitch?
The differences between the Category 1 and Category 2 3-point hitches lie in their tractor powers, top link pin diameter (20-45HP vs. 40-100HP), lift arm pin diameter (3/4 inches vs. 1 inch), and lower hitch spacing (7/8 inches vs. 1 1/8 inches).
5. What Is The Standard Width of a 3-Point Hitch?
The standard width of a three-point hitch depends on what category you are looking at.
For Category 1 3-point hitches, the standard width is 26in wide (with 7/8 lift pins, 3/4 top pin, and 18in height).
For Category 2 3-point hitches, the standard width is 32in wide (with 1 1/8 lift pins, 1 top pin, and 24in height).
For Category 3 3-point hitches, the standard width is 38in wide (with 1 7/16 lift pins, 1 1/4 top pin, and 27in height).
Read More:Best Backhoe Attachments for Tractors. After putting the top backhoe attachments for tractors to the test, here are our thoughts and reviews!
Final Words
The invention of the 3-point hitches for tractors has helped revolutionize the agricultural industry since the 1930s.
After knowing what a 3-point hitch is and how it works, you can now use it to maximize your tractor’s performance and increase your crop production.
William is a 5th-generation farmer whose passion for farming stretches far beyond the barnyard. When he’s not tending to cows and picking cherry ripe tomatoes, he’s sharing his ideas with fellow farmers and homesteaders.
 A 3-point hitch (or 3-point linkage) is a simple connector between a tractor and an implement (or an attachment) in agricultural machinery.
Three-point hitches look like triangles and are constructed with 3 movable parts: two lower arms controlled by the hydraulic system, and the upper center arm, or top link.
By using a three-point hitch, you can transfer that implements weight and resistance to the tractor’s drive wheels using this connector.
The invention of 3-point hitches opened a new era in agricultural life as it helps farmers yield, lowers human labor costs, and boosts the tractor’s functionality.
The first 3-point hitch was invented by Harry Ferguson in 1936.
In 1938, Ferguson made a production agreement with Ford Corporation to apply the first 3-point hitch to the Ford model 9N tractors in 1939, which then became a big success for Ford.
After the success of the 3-point hitch on the Ford 9N-Series, other manufacturers started producing their 3-point hitches.
By 1960, the specifications of the 3-point hitch became standardized in the agricultural industry by the American Society of Agricultural Engineers (ASAE 217) and then the International Association for Standardizations (ISO 730-1).
A 3-point hitch (or 3-point linkage) is a simple connector between a tractor and an implement (or an attachment) in agricultural machinery.
Three-point hitches look like triangles and are constructed with 3 movable parts: two lower arms controlled by the hydraulic system, and the upper center arm, or top link.
By using a three-point hitch, you can transfer that implements weight and resistance to the tractor’s drive wheels using this connector.
The invention of 3-point hitches opened a new era in agricultural life as it helps farmers yield, lowers human labor costs, and boosts the tractor’s functionality.
The first 3-point hitch was invented by Harry Ferguson in 1936.
In 1938, Ferguson made a production agreement with Ford Corporation to apply the first 3-point hitch to the Ford model 9N tractors in 1939, which then became a big success for Ford.
After the success of the 3-point hitch on the Ford 9N-Series, other manufacturers started producing their 3-point hitches.
By 1960, the specifications of the 3-point hitch became standardized in the agricultural industry by the American Society of Agricultural Engineers (ASAE 217) and then the International Association for Standardizations (ISO 730-1).
 A 3-point hitch is made of the 4 following parts to attach a wheeled tractor to an implement:
 Category 0 3-point hitches are light-duty, and they fit with agricultural implements of 20-inch wide with a distance or 12 inches from the lower pin to the top link pins.
A Category 0 3-point hitch works with popular tractor brands like John Deere, Bolens, Cub Cadet, Case, and so on.
And they can attach many implements like tillers, plows, back blades, cultivators, thatchers, etc.
Category 0 3-point hitches were popular in the 1970-1990s.
Up till now, they are only seen on used garden tractors and lawn tractors or old sub-compact tractors (like Sotah Beaver).
Due to the increasing demands of farmers, new sub-compact tractor models work better with a Category 1 hitch.
Category 0 3-point hitches are light-duty, and they fit with agricultural implements of 20-inch wide with a distance or 12 inches from the lower pin to the top link pins.
A Category 0 3-point hitch works with popular tractor brands like John Deere, Bolens, Cub Cadet, Case, and so on.
And they can attach many implements like tillers, plows, back blades, cultivators, thatchers, etc.
Category 0 3-point hitches were popular in the 1970-1990s.
Up till now, they are only seen on used garden tractors and lawn tractors or old sub-compact tractors (like Sotah Beaver).
Due to the increasing demands of farmers, new sub-compact tractor models work better with a Category 1 hitch.
 Category 1 3-point hitches fit with sub-compact and compact tractors with horsepower ranging from 20HP to 45HP.
This hitch has a top link pin diameter of ¾ inches, a lift arm diameter of 7/8 inches, and the two lift arms placed 26 inches apart.
Besides the category size, you should consider your tractor’s weight capability to pick up appropriate implements.
For example, my 6-feet Category 1 rear blade weighs 300 pounds, which is too heavy for my small sub-compact Bolens tractor.
Category 1 3-point hitches fit with sub-compact and compact tractors with horsepower ranging from 20HP to 45HP.
This hitch has a top link pin diameter of ¾ inches, a lift arm diameter of 7/8 inches, and the two lift arms placed 26 inches apart.
Besides the category size, you should consider your tractor’s weight capability to pick up appropriate implements.
For example, my 6-feet Category 1 rear blade weighs 300 pounds, which is too heavy for my small sub-compact Bolens tractor.
 Limited Category 1 3-point hitches can be used with some small sub-compact tractors.
This hitch type has the exact mounting dimensions as the Category 1 hitch but differs in the tractor’s type, the movement of the lift arms, and how much ground clearance they have.
Limited Category 1 3-point hitches can be used with some small sub-compact tractors.
This hitch type has the exact mounting dimensions as the Category 1 hitch but differs in the tractor’s type, the movement of the lift arms, and how much ground clearance they have.
 Tractors that have horsepower ranging from 40HP to 100HP can work with Category 2 3-point hitches.
These hitches use 1-inch top link pins and 1 1/8-inch lift arm pins with a lift arm spacing of 32 inches.
Due to its dimensions, Category 2 hitches can handle heavier-weight implements than Category 1 ones.
For example, they can carry back blades, box scrapers, and rakes with heavier weights and sizes.
If you have already got a Category 1 hitch, you can change the pins or use bushings to get the diameter like a Category 2 one.
And vice versa, you can switch a Category 2 hitch to a Category 1 one thanks to its interchangeable balls at the end of the lift arms.
Tractors that have horsepower ranging from 40HP to 100HP can work with Category 2 3-point hitches.
These hitches use 1-inch top link pins and 1 1/8-inch lift arm pins with a lift arm spacing of 32 inches.
Due to its dimensions, Category 2 hitches can handle heavier-weight implements than Category 1 ones.
For example, they can carry back blades, box scrapers, and rakes with heavier weights and sizes.
If you have already got a Category 1 hitch, you can change the pins or use bushings to get the diameter like a Category 2 one.
And vice versa, you can switch a Category 2 hitch to a Category 1 one thanks to its interchangeable balls at the end of the lift arms.
 You can use a Category 3 three-point hitch on tractors with horsepower that ranges from 80HP to 225HP.
This hitch has top link pins of 1 ¼ inch and lifts arm pins of 1 7/16 inches and accepts all implements for medium-sized 3-point hitches, like row-crop cultivators or field cultivators.
You can use a Category 3 three-point hitch on tractors with horsepower that ranges from 80HP to 225HP.
This hitch has top link pins of 1 ¼ inch and lifts arm pins of 1 7/16 inches and accepts all implements for medium-sized 3-point hitches, like row-crop cultivators or field cultivators.
 Category 4 3-point hitches can work with tractors of 180HP or greater.
This hitch has a top link pin diameter of 1 ¾ inches and a lift arm pin diameter of 2 inches.
The spacing between two lift arm pins of this hitch type is approximately 46 inches.
Category 4 3-point hitches can work with tractors of 180HP or greater.
This hitch has a top link pin diameter of 1 ¾ inches and a lift arm pin diameter of 2 inches.
The spacing between two lift arm pins of this hitch type is approximately 46 inches.